Contents
- 1 How to log-in
- 2 How to change password – lost password
- 3 How to Change your profile
- 4 How to Add a Post
- 5 How to get an administrator to enter a post on your behalf
- 6 How to Edit / Delete a Post
- 7 More about creating and editing Posts
- 8 How to add or remove a picture in a post
- 9 How to add, delete or update a pdf file
- 10 How to update your activities
- 11 How to enter or edit a calendar event
- 12 How to extract a members list into Excel
How to log-in
- You have already entered the website by clicking on the link http://ginclub.website/home2/gentsinnyon/
- Scroll to the bottom of the page and click on “Log in” (far right, under “META”).
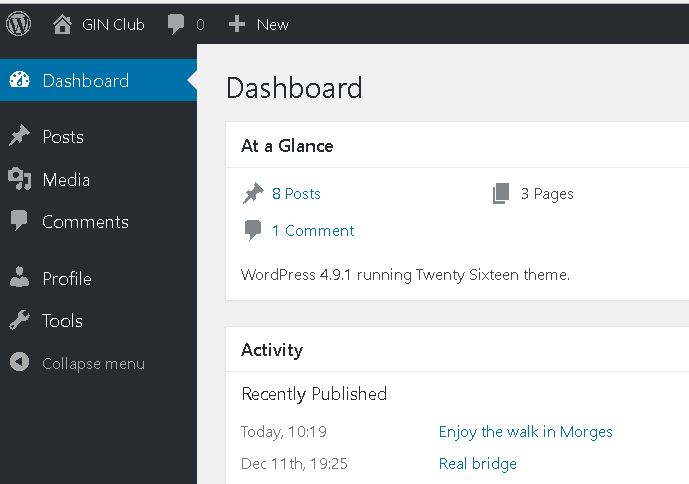
- Enter your name (first space last) or your email address plus your password and click “Log In”. This will take you to the WordPress dashboard, below.
- Normally your browser will remember and fill in your username and password so you only have to enter them once
- If you don’t have a password (forgotten, or long time since first registered), press ‘lost your password’ and you will receive a new one by email. (See next section)
- Check your “junk” or “spam” folder if you don’t see an email from WordPress with the new password.

- Note the menu on the left with links to “Profile” and “Posts”
How to change password – lost password
Click here for a pdf version you can print – How to change password
This has caused some confusion so I’ve written this step by step with lots of screen shots, in the pdf. Please advise me (Mark) if it’s still not clear or if you need an additional screen shot or two. Below is a shorter text without all the screen shots.
- Enter the GIN website by clicking here: http://ginclub.website/home2/gentsinnyon/
- Scroll to the bottom of the page and click “log in”
- The Log in screen will appear
- Click on the line “Lost your password?” at the bottom of the screen
- You will then see the reset password screen.
- Enter your name or email account and press “Get New Password”
- You will now receive an email entitled “[GIN club] Password Reset” (check spam folder if you don’t find it)
- Will contain a long link. Click it and you will see a screen suggesting a ridiculously complicated password (above the word “strong”).
- You now have 2 choices
- Use the suggested password, this is what I do, in which case follow the procedure below
- Enter your own password, something you can remember, in which case
- Enter the password over the one suggested
- Make sure you remember it
- Click “Reset Password”
- A log in screen, above will appear, enter the password and click “Log in”
- Your browser should ask if you want it to remember your password, click yes. Now you don’t have to remember or enter the password each time you log in.
Please, Please, Please advise me (Mark) if this does not work for you. Good luck.
How to Change your profile
- Log in to WordPress as above
- On the left hand side of the Dashboard page you will see a link entitled “profile”, click this.
- This brings up a page where you can enter your personal details such as First Name, Last Name, email address, password, phone numbers and address.
- First Name and Last Name will be combined to create the name that will be used in the members information section. So make sure these are not left blank.
- You can change your password as often as you wish. WordPress will suggest a very long password. You can use a password of your choice but must click a special box to confirm that you are selecting what WordPress considers weak.
- If you scroll down the above page you will come to a section where you can change your phone numbers and postal address. Please keep these up to date so other members can contact you.
- You can also add some personal information and a photo if you wish. There is a link to a product called “Gravatar” where you can upload a photo and personal information that will then be shown when you create posts.
- Click ‘Update Profile’ when done.
How to Add a Post
- Everyone has been set up as an author which means you can add your own posts to the blog.
- Alternatively, if you feel unable to enter the post yourself, you can email it to one of the administrators, Mark Watts or Peter Taylor, and we will enter it for you, see below.
- This is relatively simple but you must first log in, see above.
- On the dashboard menu down the left hand side, click “Posts”, then click “Add New”.
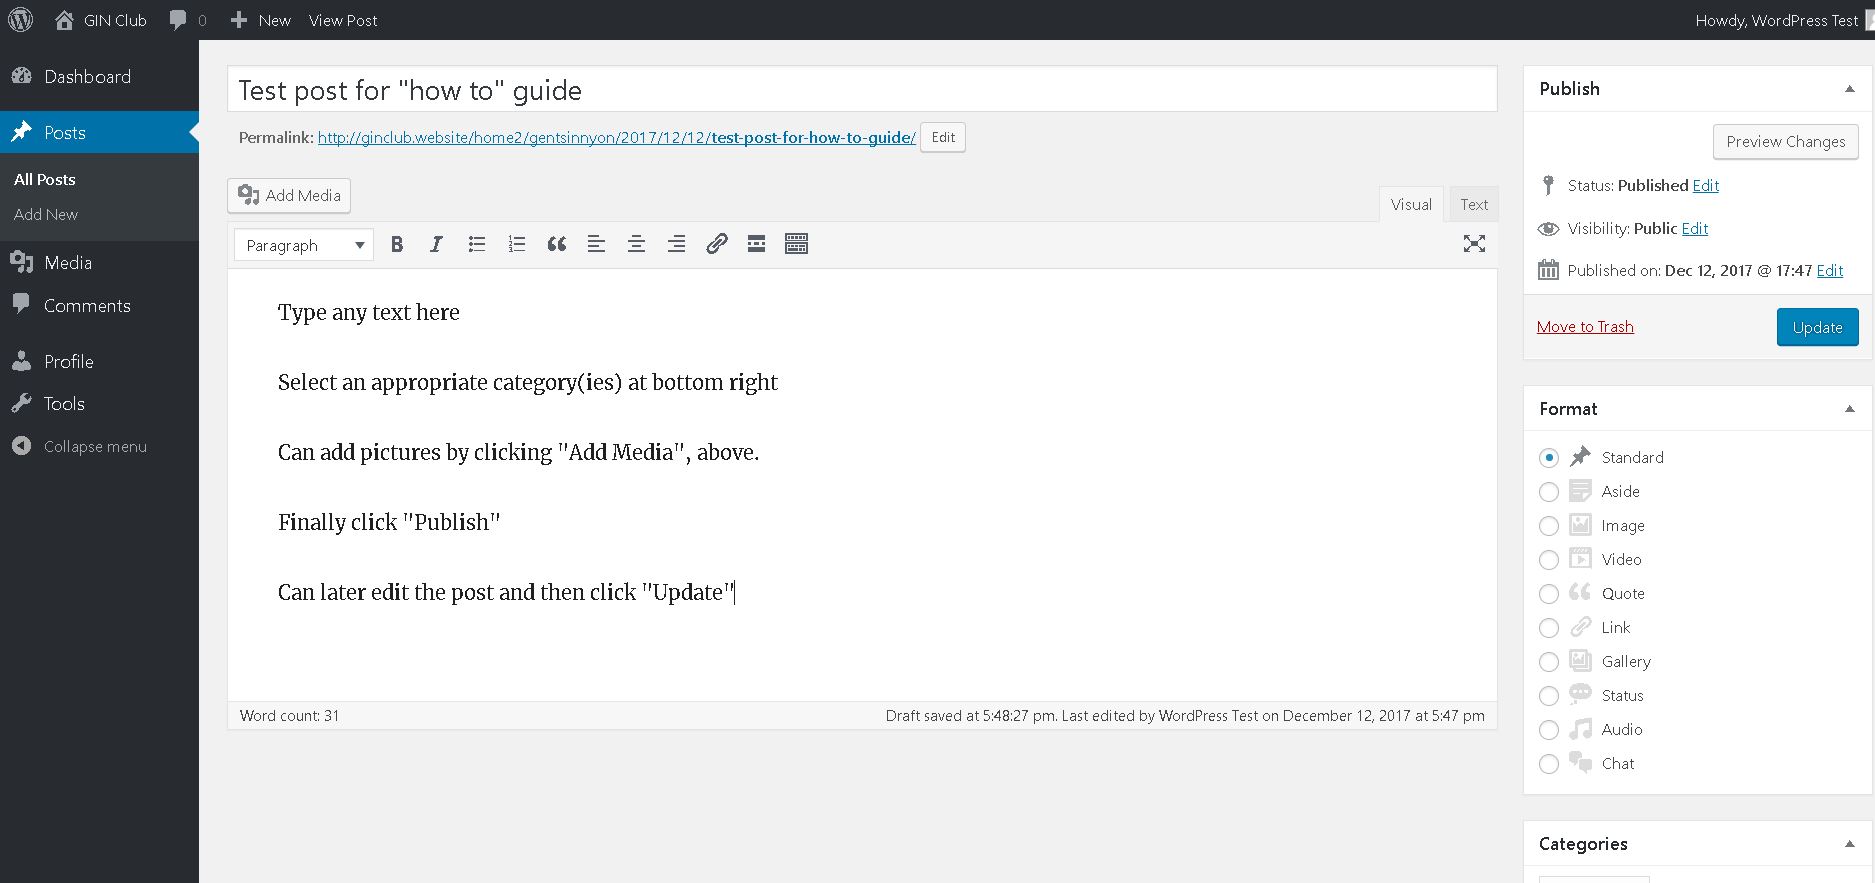
- A screen like that shown below will appear. This may appear daunting the first time but it’s really no more difficult than typing an email:-
- Enter a title for this post in the top bar.
- Type the contents in the section below.
- Select a category from the options in the right hand panel.
- Click “Publish” at the top of the right hand panel.

- You can change any details later, or delete the Post if you wish
How to get an administrator to enter a post on your behalf
It is easy for an administrator, Mark Watts or Peter Taylor, to enter the post on your behalf provided you follow some simple rules, below:
- Do not use any special formatting such as bold, different fonts, colours etc. The text you send will be pasted in as plain text so any formatting will be lost.
- This especially means do not use carriage returns (Enter button) in your text unless you specifically want a new paragraph. WordPress will wrap the text to fit the correct page width but any unnecessary returns you have entered will screw this up resulting in many short lines.
- Send any photographs as attachments, do not embed them in your email or send a link to another folder or Google photos. The administrator will have to one-by-one download these photos into a file before he can use them.
- Send any photos as reduced size. Your mail system should give you a choice of size when mailing the photos. As a rule of thumb aim for about 100 to 150 MB per photo or no more than 1GB for the full set. This is important to keep the size of all posts to something reasonable since I backup the whole website to my own PC on a regular basis – cheaper than paying for a backup service.
We will enter the text with you as the author so that readers know who wrote it. It also means that you can later edit it yourself, but you will need to log-on for that.
How to Edit / Delete a Post
- You can only edit or delete posts that you created.
- Log in to WordPress as above
- On the dashboard menu down the left hand side, click “Posts”, then click “All Posts”.
- A screen will appear showing just the posts you have created.
- Pass the mouse cursor over the title and a line will appear Edit | Quick Edit | Trash | View
- Click “Trash” to delete the post. Deletion is immediate without another warning but it is possible to undo it on the screen that follows.
- Click on “Edit”, the post will be shown in the same format as when you created it except the “Publish” button will be replaced with “Update”.
- Simply make your changes and press “Update”
More about creating and editing Posts
- WordPress has a new and very powerful editor, called a Block Editor. If you don’t want to do anything more adventurous than adding a few paragraphs of text then this need not concern you and you can use it just like typing an email.
- However, if you want to add pictures, other files, headings, links to other parts of the web or to other sites, tables or many other possibilities then this is where the power of the block editor will help.
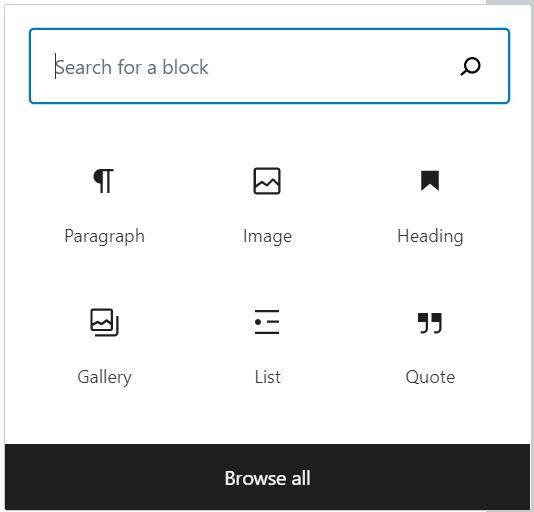
- Each time you press the return key it creates a new block (like a paragraph) and shows a plus sign in white on black.
- The default block is a paragraph so you can just continue typing, or
- Press the plus sign to see the options available and click on the appropriate option.

- Please select a category. almost all texts will relate to a specific activity. The categories are simply the activity names.
- At the end select “Publish” or “Update” button on the right.
- Please experiment. You can’t do any harm. You can later delete your post if you decide you don’t like it.
- As a last resort the webmaster (Mark) can edit or delete the post for you.
How to add or remove a picture in a post
I’m assuming you’ve already logged in and are already editing or creating a post, see above, I’m also assuming the picture is already stored on your computer . Adding a picture is easy.
Create a new block by pressing the return key. Now click the plus sign on the screen to show the block options.
Chose “Image”. Select “Upload” and find the picture you want to upload. Click on it and press “Open”. This will load a copy of the picture into the browser and insert it into your post.
To delete a picture from a post
Click on the picture. A panel will appear above. Click the right hand box (3 vertical dots). This opens a menu where the last item is “Remove block”. Select this and the picture will disappear.
How to add, delete or update a pdf file
These are handled slightly differently. The pdf file is inserted as a link which, when clicked, will display the pdf in a new window.
As before create a new block by pressing the return key. Now click the plus sign on the screen to show the block options. The bottom of the screen shows “Browse all”, click here and select “File” from the options shown.

Click “Upload” and select the pdf file. It will show a link with the name of the file.
To delete a pdf, click the link then proceed as for deleting an image.
To update a pdf you must first delete the old version, then upload and insert the new version, see above.
How to update your activities
First you must log-in, see above. Then point the mouse to the item ‘GIN CLUB’ in the top menu strip. The caption ‘Visit Site’ will appear, click it. You are now in the main site but logged-in.
You will see a message telling you that you are logged-in.
Below is a line ‘ View or change the activities you are signed up for’. Click it and you will see a screen with a checkbox for each activity. Check or un-check activities as you wish and press ‘Update’. You can make changes as often as you wish and they will become effective immediately so if you make an error you can easily undo it.
The activity called ‘All Members’ is inactive, it will always be checked.
How to enter or edit a calendar event
All members can enter calendar events and can later modify their own events. They can also copy ANY event then edit this and save it as their own event (the original will not be changed).
First you must log-in, see above. Then point the mouse to the item ‘GIN CLUB’ in the top menu strip. The caption ‘Visit Site’ will appear, click it. You are now in the main site but logged-in. You will see the home page. The second entry in this page reads “Calendar of Events (view or change).
Click on this entry. The normal calendar will appear but with all dates and events underlined (hyperlinks).
Click on a date to create a new event for that date, or on an event to edit, copy or delete that event.
Hopefully the procedure should be obvious, let me know if it’s not so that I can add explanations.
You are not allowed to change any entries created by anyone else so you should not be able to do any harm. As a last resort I (Mark) can undo any changes directly in the database. I also make a full backup of the database at regular intervals just in case.
There is a feature to create repeating events, say every week, 2nd Thursday of each month and stuff like that. This is currently only used for a couple of activities which are scheduled weekly but could be used for anything else which is scheduled on a regular basis. You can then click one of the scheduled events and chose to edit the whole sequence, just the selected (clicked) occurrence, or the selected occurrence plus all future occurrences.
To summarise, this is the logic:
- Any member can create a new calendar entry (must be logged in first)
- Member can then edit or delete any entry he created.
- Member can copy an entry made by himself or by any other member and use it as the basis of a new calendar entry. The original will not be changed.
- Nothing gets deleted from the database:
- when you modify an event the old entry is marked as “inactive” and a new entry created.
- when you edit part of a recurring event it creates up to 3 new events (old, this, future) and marks the original as inactive.
How to extract a members list into Excel
You will have already selected “Member Details” from the home screen.
You now get several choices, such as:
- Members eMails and Phone Numbers
- Members Addresses
- Members and Activities
- Activity Organisers
- Member Details by Activity
Clicking any of the above will show the detail, clicking again will hide the detail. Clicking “Member Details by Activity” will show a list of activities which can each be clicked to show the detail.
Once the detail is shown, you will also see 2 links “Print” and “Download as Excel file”.
- Clicking “Print” converts the information in the table into a pdf file with options at the top right to print the file or to save it to your computer.
- Clicking “Download as Excel file” will download the table as a csv, comma separated values, file. This will be saved in the downloads folder on your computer. See below for how to open this.
There are a couple of other links for downloading an Excel spreadsheet.
- For each of the activities under “member Details by Activity”, there is an additional link “Download contact details of activity members as Excel file”. This will download a table containing names, email addresses, phone numbers AND house addresses.
- At the very bottom of the page there is a link “Download full GIN members table as Excel file”. This file contains all the above information, and more, in all the above tables. Thus it contains
- names, email addresses, phone numbers and house addresses.
- list of all activities each member is signed up for
- an extra field showing whether the member is still an active member of the GIN club.
- a reference number for each member. This is only really of use to the administrators.
How to get an Excel file from the csv file.
Normally all you need to do is to double click the csv file and it will automatically open it in Excel. You will still need to do a little formatting as described below.
Excel will open with all columns the same width. This will render it unreadable.
See the picture above.
- Click the small triangle above “1” and to the left of “A”. This will select the whole sheet (will appear shaded)
- Now place the cursor on the line between “A” and “B” and double click. This will resize each column to just the size required.
- You may want to highlight the headers, click “1”, just below the triangle and select B.
- Make sure you save the file as an Excel file, not as csv or you will lose the formatting you’ve just added. Select “File”, “Save as”.
With some old versions of Excel the csv file will not open correctly. You will see a lot of the elements with quotation signs round them. In this case proceed as follows.
- Open the file in Notepad, or some other very simple editor: open Notepad first, the select “File”, “Open”, make sure you select all file types. You will get a file like the following.
- Select all the text and paste it into the first column of an Excel sheet.
- Click the “A” at the top of the first column. Will select the whole column, Will appear shaded.
- Now select “Data”, “Text to Columns”. Select “Delimiter” and click “Next”
- On the next page select Comma as the delimiter and ensure the Text qualifier is a double quote, ” . Select “Next” then “Finish”
- All the text will now appear in the correct columns. You will still need to adjust the column widths as described above.

Can I please join your mens group. Gary Vanatter referred me to you group. Thanks, Charlie Lamento
Great work Mark
Nice job Mark.
Test of leaving a comment on this page